


How to Make Lederhosen? A Complete Step-by-Step Guide
1. Why Make Your Own Lederhosen?
Lederhosen are iconic Bavarian shorts traditionally made from leather. While many choose to buy them ready-made, crafting your own pair can be a fun and rewarding DIY project. Making Lederhosen allows you to choose your favorite material, create a perfect fit, and add personalized details. Its also a great way to connect with Alpine culture, whether you plan to wear them to Oktoberfest or simply love traditional German clothing. With a few tools, basic sewing skills, and patience, you can create something authentic and long-lasting.
2. Know the History Before You Start
Before jumping into making your Lederhosen, its helpful to understand their origins. These garments began as durable workwear for farmers and hunters in southern Germany and Austria. Their strong leather fabric helped people move through the rugged Alpine terrain. Over time, Lederhosen became festive attire for events like Oktoberfest and folk festivals. Today, they are worn by men, women, and even kids, often paired with checked shirts and Haferl shoes. Knowing this background adds cultural value to your handmade piece.
3. Choosing the Right Leather
Your Lederhosen will only be as good as the leather you use. Traditional versions are made of deerskin or goatskin, which are soft, strong, and naturally breathable. Calfskin is also commonly used. However, for beginners, suede or velour leather is easier to sew and more affordable. Look for soft and flexible hides that arent too thick. You can get an idea of quality by browsing this soft suede design made in traditional Bavarian style.
4. Tools and Supplies Youll Need
To get started, gather the following:
-
Leather (suede or real)
-
Paper for pattern making
-
Fabric scissors or rotary cutter
-
Leather needles
-
Waxed thread
-
Rivets or decorative buttons
-
Tailors chalk
-
Measuring tape
-
Strong sewing machine (or hand-sewing tools)
Make sure to test your machine on leather scraps before starting.
5. Take Proper Measurements
Before you cut anything, take accurate body measurements. Youll need your:
-
Waist circumference
-
Hip width
-
Thigh circumference
-
Inseam (crotch to knee)
-
Outer leg length
Use these numbers when drawing your pattern to ensure a proper fit. Lederhosen are meant to be snug but not too tightthey should allow comfortable movement.
6. Making a Paper Pattern
You can buy ready-made Lederhosen patterns or draw your own using shorts as a base. Sketch out the different parts: front panels, back panels, waistband, fly area, and pocket flaps. Dont forget the signature front flap (Hosenlatz). Label each piece, and add a 1 cm seam allowance around every edge. Cut your paper pieces and lay them out on the leather for tracing.
7. Cut the Leather Carefully
Place your pattern on the back side of the leather and trace around with tailors chalk or a pen that shows clearly. Always double-check your outlines before cutting. Use strong scissors or a rotary cutter to follow the lines. Leather doesnt fray like fabric, but precision is still key for clean seams and a neat finish.
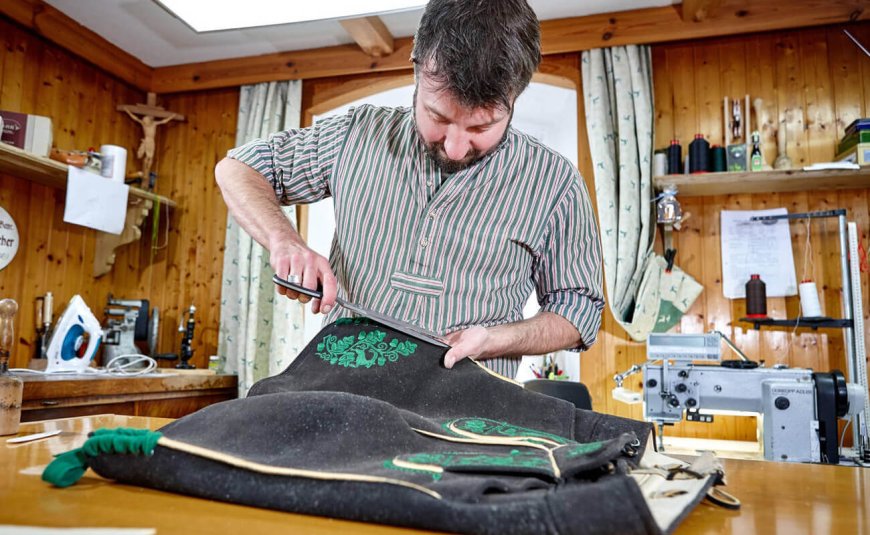
8. Start Sewing the Basic Structure
Use a heavy-duty sewing machine or sew by hand with waxed thread. Begin by joining the front and back panels at the side seams, then sew the inner leg seams. Attach the waistband and the signature flap. Backstitch all seams for strength. For decorative stitching, practice on scraps first. Many modern Bavarian-style womens Lederhosen also include floral embroideryfeel free to add your own flair.
9. Add Buttons, Closures, and Details
Lederhosen usually have buttons made from horn, wood, or metal. Youll need to attach:
-
Buttons at the waistband
-
Decorative buttons on the sides
-
Closures on the front flap
-
Loops for suspenders (optional)
Use leather punches or an awl to make small holes before sewing or riveting them into place.
10. Create Decorative Embroidery (Optional)
If you want a more traditional look, you can add embroidery on the front flap, pockets, or sides. Use contrasting thread colors like white or green. Draw your design lightly in chalk, then stitch by hand using a tight running stitch or chain stitch. Keep it simple if you're new to embroidery.
11. Try Them On and Adjust
Before finalizing, try the Lederhosen on. Check for comfort around the thighs, hips, and waist. Make sure the length is right and the waistband sits well. Make any minor adjustments to seams or add darts for shaping. Leather molds to your body over time, so dont worry if they feel a bit stiff at first.
12. Caring for Your Handmade Lederhosen
Leather needs proper care. Never machine-wash Lederhosen. Instead, wipe them with a damp cloth and air dry. Use leather conditioners occasionally to keep them soft. Store them in a cool, dry place. With care, your Lederhosen will last for years and age beautifully.
13. Add Personal Touches
Customize your project with unique elements like:
-
Contrasting thread
-
Vintage buttons
-
Personalized embroidery
-
Etched initials or symbols
This not only makes your Lederhosen stand out but also adds sentimental value.
14. Pairing Your Lederhosen with the Right Outfit
Once your Lederhosen are ready, wear them with a classic checkered shirt, wool socks, and Haferl shoes. For women, pair with a blouse and accessories like suspenders or a cropped jacket. Take a look at this heritage-inspired shop to see how traditional pieces are styled in real outfits.
15. Final Thoughts
Making your own Lederhosen takes time, but the result is a custom, authentic piece that connects you to Alpine tradition. Its a great project for DIY lovers and culture enthusiasts alike. Whether you're wearing them to Oktoberfest or a themed party, your handmade Lederhosen will be a proud piece of craftsmanship.